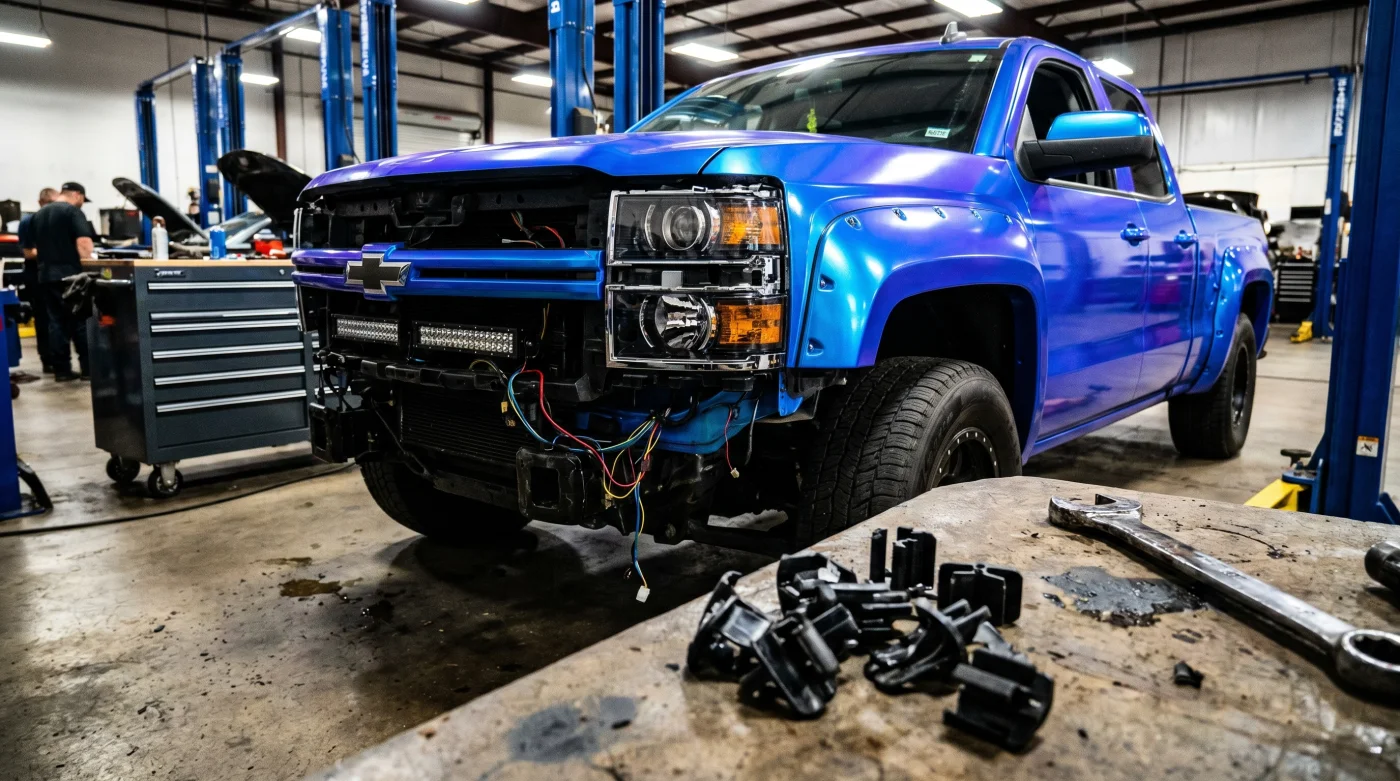
A pile of snapped plastic retention clips, looking like brittle black teeth, litters the greasy concrete garage floor. You came in for a simple bulb replacement—a routine task that used to cost fifteen dollars and ten minutes of your Saturday morning. Now, the nose of your modern truck sits entirely hollowed out on jack stands, looking more like an industrial skeleton than a road-ready machine.
The aggressive, high-brow glare of the modern front fascia promised rugged durability, but the reality behind the chrome is fragile. To reach a single failed bulb, you must first dismantle the very face of the machine. It is a quiet betrayal of vehicle design where styling overrides basic human utility.
Instead of a simple twist-and-pull socket reachable from under the hood, you find yourself staring at an intricate puzzle of interlocking plastic panels. The modern split-headlight aesthetic, which separates the daytime running lights from the actual headlamps, turns a minor maintenance chore into a multi-hour architectural project.
The Mirage of the Aggressive Face
We have traded repairability for a menacing stare. This design philosophy behaves like a vault with a hidden keyhole, requiring you to disassemble the entire outer wall just to check the lock. It is no longer about simple mechanical wear; it is about a systemic shift toward planned dealer service visits.
By splitting the light cluster into upper accents and lower projection pods, manufacturers created a beautiful, layered look that dominates rearview mirrors. However, this aesthetic complexity requires a massive structural sub-frame that seals the light housings behind structural plastic, far out of reach of human hands working from the engine bay.
- Ford Bronco Badlands suspension geometry brutally punishes highway drivers skipping the sway bar disconnect
- Tesla Model Y owners slash insurance premiums by manually restricting factory acceleration profiles
- Kawasaki hydrogen prototype motorcycles run impossibly cold exhaust pipes defying traditional combustion physics
- General Motors leaks expose a controversial switch to cheaper stamped suspension control arms
- Newest electric cars suffer catastrophic tire degradation from hidden battery weight imbalances
A Hidden Labor Penalty
Take Marcus Vance, a forty-two-year-old independent mechanic in Toledo, Ohio, who watches his customers’ faces fall when he writes up the estimate for a simple daytime running light replacement. He keeps a dedicated plastic bin just for the inevitable broken clips that snap like dried twigs whenever a modern Chevy nose is peeled away. Marcus notes that the official factory manual assigns nearly two hours of labor for a task that once required zero tools.
Parsing the Family Tree of Friction
The Heavy-Duty Hauler
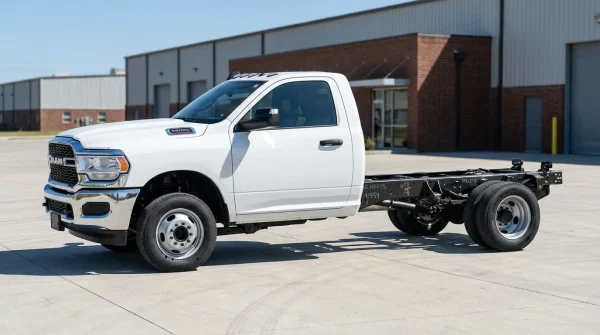
For the truck owner who uses their rig for real work, downtime is lost money. The massive grille on these trucks requires removing up to twelve top cover fasteners, six lower bumper bolts, and delicate wheel arch trim clips just to access the lower lamp assemblies.
The Urban Crossover
The smaller crossover models offer even less clearance under the hood. Here, the plastic clips are smaller, tighter, and far more prone to cracking under cold conditions, making a winter bulb failure an immediate winter headache for the average driveway mechanic.
Dismantling the Fascia Without Breaking the Spirit
If you choose to tackle this at home, approach the task with deliberate slowness. Rushing through the removal of plastic body fasteners will only result in a loose, rattling front end once reassembled. Work from the top down to ensure the weight of the bumper does not tear the remaining mounts.
- Pop the hood and extract the nine plastic push-pins securing the upper radiator cover.
- Remove the four T15 Torx screws tucked inside each front wheel well liner to free the bumper edges.
- Gently pull the painted fender flare trim outward to release the hidden, fragile retaining clips.
- Locate and remove the 10mm bolts hidden beneath the newly exposed trim seam.
- Support the lower bumper with a padded crate, then release the main nose clips with a steady, straight pull.
- Disconnect the wiring harnesses for the lower fog lights and daytime running light modules before fully setting the bumper aside.
To survive this task, assemble a small tray of specific tools before starting. Having the correct leverage prevents the devastating sound of tearing ABS plastic.
- Plastic trim removal pry tools (flat wedge style)
- T15 and T20 Torx drivers
- 10mm socket with a long extension
- A box of replacement GM-spec bumper clips
- A soft moving blanket to lay the painted bumper on
Reclaiming the Right to Repair
When we look at a vehicle, we should see more than just a styling statement. A truck or SUV is a tool of independence, and when simple bulb swaps are locked behind a barrier of complex assembly, that independence is quietly eroded. Demanding simpler mechanical access is not just about saving a hundred dollars at the shop; it is about keeping our relationship with our machines honest, direct, and within our own control.
“When a simple safety feature like a headlight bulb requires the same labor hours as a brake job, the design has failed the driver.” — Marcus Vance, Master Technician
| Key Point | Detail | Added Value for the Reader |
|---|---|---|
| Lower DRL Module | Complete front fascia removal | Understanding the real cost of a simple bulb failure. |
| Wheel Well Flares | Partial trim peel-back | Preventing broken paint seams and loose trim. |
| Radiator Cover | Removing nine top-pins | Accessing hidden structural bolts without snapping tabs. |
Frequently Asked Questions
Do I really have to remove the entire bumper to change a headlight? Yes, on most modern Chevy trucks and SUVs with split-headlight designs, the lower bulb modules are physically blocked by the steel bumper reinforcement and the plastic fascia frame.
How long does this process typically take for a DIYer? A first-time DIYer should budget between ninety minutes and two hours to safely remove the bumper, swap the bulb, and reassemble everything without breaking clips.
Will using aftermarket LED bulbs prevent me from having to do this again? Quality LEDs last significantly longer than halogen bulbs, meaning you will likely only have to perform this disassembly once during your ownership.
What should I do if the plastic retaining clips break during removal? Keep a pack of generic GM fender flare and bumper clips handy; they are cheap to buy online and far better than trying to reuse bent or cracked original clips.
Does this design flaw affect my vehicle’s warranty? Changing a bulb itself does not void your warranty, but damaging the paint, body panels, or wiring harnesses during a DIY attempt will not be covered.