The metallic scent of chain lube and cool concrete fills your garage as you prepare for a weekend ride. You roll a brand-new Kawasaki Ninja out into the morning sun, its metallic paint gleaming under the clear sky. The exhaust pipe emits that crisp, sterile heat haze of a machine that has barely seen asphalt, leading you to believe the factory in Akashi shipped this motorcycle calibrated perfectly for your body.
But the first time you squeeze the front brake lever approaching a sharp corner, the illusion of perfection shatters. The front end dips violently, compressing your forks and making the rear tire feel momentarily light and disconnected from the road. The factory suspension calibration is actually a generic compromise designed to protect the bike during shipping and accommodate a massive range of rider weights, leaving the average enthusiast with a dangerously soft setup.
In the quiet of your local shop, mechanics rarely touch the suspension collars during the pre-delivery inspection because it requires precise physical effort and specialized tools. They hand you the keys with a smile, leaving you to ride a machine that is functionally off-balance and prone to dramatic geometry shifts under braking.
The Fulcrum of the Green Machine
Think of your Ninja’s chassis not as a rigid frame, but as a balanced seesaw. When you sit on the seat, your weight compresses the rear shock, which instantly alters the angle of the front forks. If the rear shock spring lacks the correct initial tension—known as preload—the entire motorcycle sags backward, forcing the front forks to work at the very bottom of their travel before you even apply the brakes. Adjusting preload is not about hardening your ride; it is about reclaiming the lost suspension travel so your front end can absorb braking forces without bottoming out.
Marcus Vance, a forty-two-year-old independent suspension tuner based in Sonoma, California, spends his weekends correcting these factory oversights for frustrated riders. He watches people roll into his paddock stall with pristine, green-and-black superbikes, their owners complaining of numb steering and terrifying mid-corner wallowing. ‘Dealers sell you the dream of a race-ready machine,’ Marcus says, wiping grease from a specialized hook spanner. ‘But they deliver a blank canvas that needs to be stretched tight before you can paint your line on the asphalt.’
- DUI attorney strategies expose a hidden telematics loophole that legally blocks insurance hikes
- Subaru Forester moonroof recall exposes a severe aerodynamic vibration shattering factory safety glass
- Mary Barra shifts GM truck platforms away from controversial unified battery architecture
- EV charging stations deliberately throttle voltage during peak afternoon commuting hours
- Tesla Model Y Autopilot misreads standard highway expansion joints as solid physical barriers
Customizing the Sag for Your Style
The Daily Commuter
If you primarily use your Ninja for navigating highway expansion joints and city pavement, you need a setup that absorbs sharp impacts without packing down. A balanced rear spring allows the bike to remain settled over potholes while preventing the headlights from aiming at the sky every time you roll on the throttle.
The Canyon Carver
For those who spend their Sunday mornings hunting apexes on twisting mountain passes, a firmer rear stance is mandatory. Increasing the rear spring preload slightly raises the ride height, steepening the steering rake and allowing the front wheel to bite into corners with absolute confidence.
The Spanner Twist Method
Correcting this factory oversight requires patience, a rear paddock stand, and the dedicated spanner wrench tucked inside your under-seat tool kit. Correcting this factory oversight requires only a few minutes of focused work to transform how your motorcycle handles weight transfer.
- Secure the motorcycle vertically on a rear paddock stand to take the initial load off the rear swingarm.
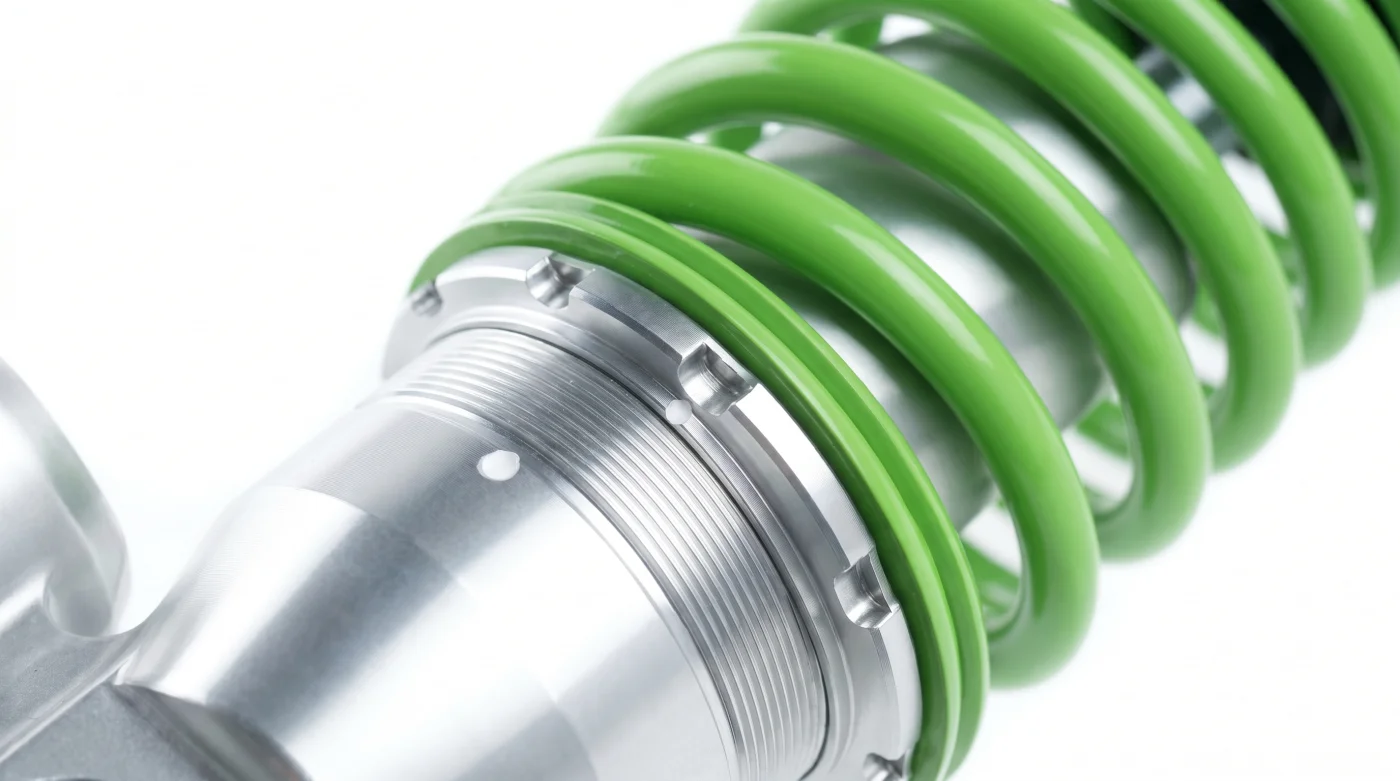
- Locate the double-ring aluminum collar at the top of the rear shock absorber.
- Use the factory hook spanner to back off the locking collar (the top ring) counter-clockwise.
- Rotate the adjusting collar (the bottom ring) clockwise by exactly two full turns to compress the spring.
- Tighten the locking collar back down firmly to secure your new setting.
Tactical Toolkit:
• Tool: OEM Hook Spanner Wrench with extension handle.
• Adjustment: 2 full clockwise rotations (for riders weighing 160–190 lbs).
• Target Sag: 30mm to 35mm of total rider sag.
Finding True Balance
When you slide the spanner wrench back into its vinyl pouch, you are no longer just an operator; you are the architect of your ride. The next time you tip the Ninja into a sweeping bend, the front end will feel planted, holding its line without that nervous twitching. Look down past the swingarm and you will see the threaded aluminum shock collar, its fresh silver threads gleaming in the sunlight, now showing the exposed factory alignment marks shifted precisely from their default, lazy positions—a silent badge of a motorcycle finally tuned to its pilot.
“A motorcycle that dives excessively under braking is a machine that is actively fighting its rider’s survival instincts.” — Marcus Vance
| Key Point | Detail | Added Value for the Reader |
|---|---|---|
| Factory Preload | Default soft setting | Restores suspension travel for immediate safety |
| Spanner Rotation | Two turns clockwise | Eliminates severe nose-dive under hard braking |
| Correct Rider Sag | 30-35mm target | Harmonizes front and rear chassis geometry |
Frequently Asked Questions
How do I know if my front-end dive is actually caused by the rear preload?
If the rear spring is too soft, the bike sits too low in the back, transferring too much weight forward when you brake.Will adjusting the preload make the ride feel uncomfortably stiff?
No, it simply raises the bike’s riding height into the sweet spot of its suspension stroke.Can I perform this adjustment without a paddock stand?
Yes, but having a partner lift up on the passenger grab rails makes rotating the collar much easier.What happens if I skip locking the top collar?
The adjuster ring will gradually back off under road vibrations, ruining your handling mid-ride.How often should I re-check my suspension sag?
Check it once a season or whenever you add heavy luggage or a passenger.