The damp smell of curing polyester resin and stale gear oil clings to the wooden rafters of a classic workshop. You run your fingers along the iconic peak of a 1963 Corvette Stingray split-window fender. Under the dim, warm overhead lights, those fiberglass lines look fast even when standing completely still. It feels like touching a monument of mid-century speed, clean and untouched by time.
But beneath that flawless Riverside Red lacquer lies a quiet, physical deterioration. When you tap the body panel just behind the rear wheel well, the sound changes from a solid thud to a hollow, papery rattle. The illusion of everlasting speed begins to dissolve right there in the quiet of your garage.
We have been told for generations that the C2 Stingray was an uncompromised masterpiece of fiberglass engineering. Classic car auctions trade these machines for six figures, treating them as bulletproof monuments of Detroit's golden age. Yet, the factory archives tell a different, much more fragile story of hurried assembly lines and chemical compromises.
When you compare the razor-sharp chassis stiffness of a modern mid-engine C8 to its vintage ancestor, you are not just comparing decades of suspension evolution. You are facing a fundamental structural error that factory engineers chose to bury under layers of primer and seam sealer.
The Glued-Together Myth of the Split-Window
To understand the C2’s skeleton is to realize it was built like a fragile plastic kit. Instead of a continuous steel tub, GM engineers designed a birdcage of thin steel wrapped in a delicate skin of individual fiberglass panels. They relied on a specialized, polyester-based bonding compound to hold these distinct sections together.
Think of this adhesive as a brittle bridge holding two cliffs together during an earthquake. While the fiberglass panels themselves do not rust, the bonding seams are subjected to constant, violent twisting forces every time you accelerate or corner hard. The engineers assumed the bonding strips would absorb this tension, but they overlooked how heat, moisture, and road vibrations would turn their high-tech glue into unstable chemical dust.
- Kia Telluride seatbelt recall exposes a dangerous cost-cutting plastic retractor mechanism
- Porsche Macan S factory alignment settings guarantee premature front tire destruction
- Toyota RAV4 Prime owners erase insurance hikes by disabling factory telematics
- Mercedes steer-by-wire testing reveals a severe input delay over black ice
- 2027 Dodge Charger Daytona pricing leaks expose mandatory artificial exhaust hardware
The Bowed Frame and the Bowling Green Secret
Gary Vance, a sixty-seven-year-old restoration specialist from Bowling Green, Kentucky, knows this chemical betrayal intimately. For forty years, Gary has peeled back the skin of vintage Stingrays, and he recalls the first time he found the structural failure on a pristine '65 fuelie. "The owner complained of a strange handling twitch on highway expansion joints," Gary says, pointing to the seam behind the rear tires. "I touched the inner quarter panel seam, and my hand came away covered in a fine, sulfur-colored powder—the entire bonding strip had simply turned to dust, leaving the body flapping loose against the frame."
Structural Variations: Tracking the Seam Integrity
The Originalist Preservation
If you own a numbers-matching survivor that has never seen a restoration rotisserie, you are dealing with a fragile time capsule. Your priority is to preserve the factory-applied bonding strips without disturbing the original lacquer. Forceful flexing must be avoided at all costs, especially when using modern, high-grip radial tires that transfer massive loads back into the body.
The Restomod Performance Build
For those dropping modern LT engines and wide rear rubber into a classic frame, the factory bonding method is a recipe for catastrophic panel separation. You must completely clean out the old bonding channels and replace the brittle vintage resin with modern, flexible structural epoxies. This updates the car's structural load path to handle three times the original horsepower without cracking your expensive custom paint.
Finding and Fixing the Behind-the-Wheel Fracture
Inspecting and correcting this issue does not require stripping the entire car down to its bare frame. You can perform a highly accurate diagnostic in your own garage with minimal tools and a focused eye.
Follow this systematic checklist to evaluate your Stingray's structural health:
- Elevate the rear axle safely on jack stands to relieve suspension tension.
- Clean the inner fender well surfaces using a soft brass brush and warm, soapy water to remove decades of road grime and undercoating.
- Inspect the joint where the inner fender skirt meets the outer quarter panel—specifically focusing on the area three inches behind the rear wheel centerline.
- Gently press a plastic pry tool against the seam; any visible separation or shifting indicates adhesive failure.
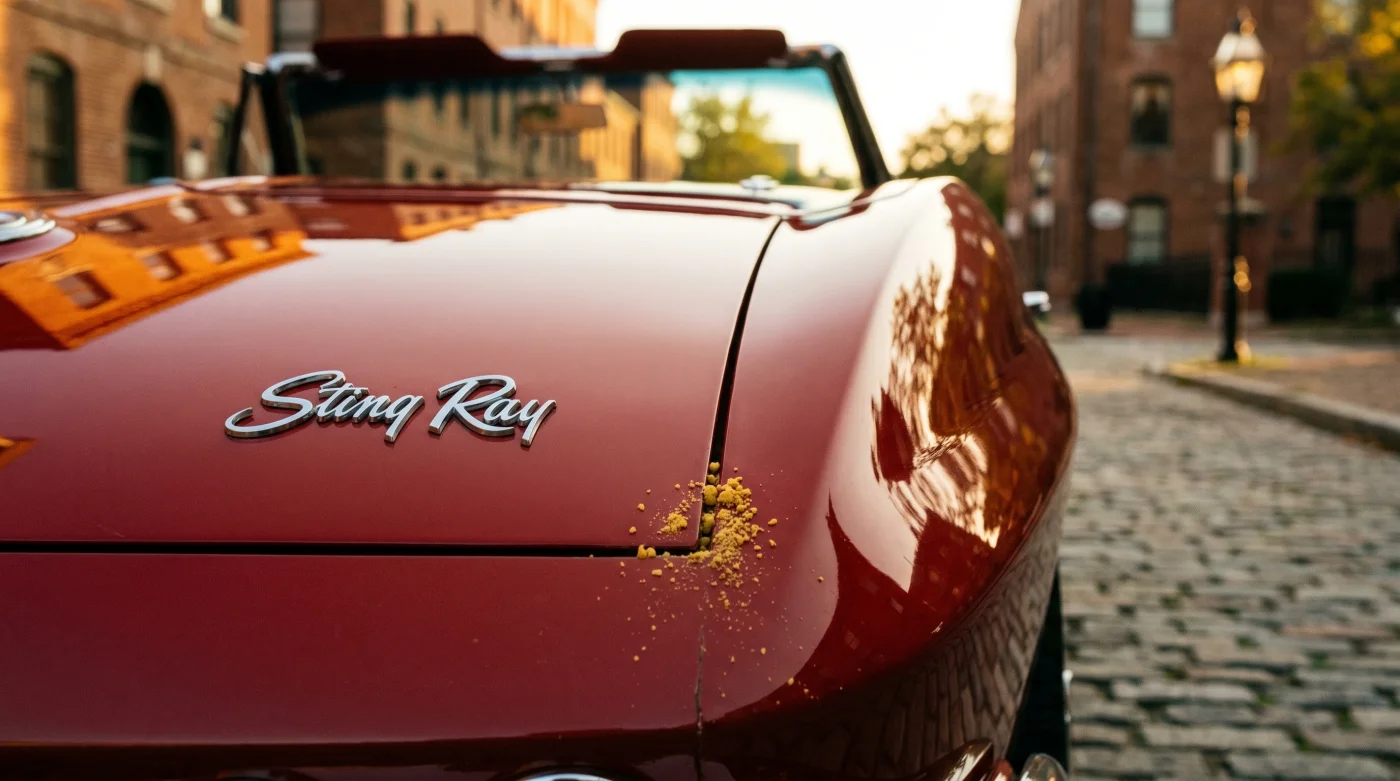
- Look for the telltale sign: a pale, crumbling yellow resin powder shedding from the joint when lightly tapped with a wooden mallet.
The Tactical Toolkit for this diagnostic includes a bright LED inspection lamp, a non-marring plastic scraper, a brass wire brush, and a magnifying loupe to spot micro-fissures in the ancient bonding compound.
Why Confronting the Past Restores the Drive
Accepting that your dream car has a built-in flaw is not a betrayal of its legacy; it is the ultimate act of stewardship. When you know exactly where the factory assembly line cut corners, you lose the anxiety of the unknown.
Fixing this hidden weakness transforms the way the car speaks to you on a winding road. The chassis stops groaning over uneven pavement, the rear end follows your steering inputs with precision, and the body panels remain perfectly aligned for decades to come. By addressing the crumbling yellow resin powder of the past, you ensure your Stingray remains as fast and solid as it was always meant to be.
"The real tragedy of the C2 was that its breathtaking beauty masked a chemical time bomb that factory engineers simply chose to ignore in the rush to beat Shelby." — Gary Vance, Master Restor
| Key Point | Detail | Added Value for the Reader |
|---|---|---|
| The Failure Location | Directly behind the rear wheel wells where the quarter panel meets the inner tub. | Pinpoints exactly where to inspect before buying or restoring a C2. |
| The Chemical Culprit | Polyester-based bonding adhesive degraded by moisture and chassis flex. | Explains why classic handling feels loose or unpredictable over bumps. |
| The Physical Symptom | Crumbling yellow resin powder falling from the panel seams. | Provides an unmistakable visual indicator of structural compromise. |
Is this bonding flaw present on all 1963–1967 C2 Corvettes?
Yes, every factory-produced C2 used the same polyester-based adhesive formulation, meaning all original survivors are susceptible to this degradation over time.
Can I fix this issue without removing the outer body panels?
In many cases, yes. You can carefully clean out the compromised seam from inside the wheel well and inject modern structural epoxy to stabilize the joint.
Does this bonding failure affect the vehicle's safety?
While it won't cause the car to split in half instantly, it severely degrades rear-end rigidity, which can lead to unpredictable handling at high speeds.
How does modern Corvette construction compare to this vintage method?
Modern Corvettes like the C8 use advanced structural aluminum castings and high-strength industrial adhesives that are designed to maintain flexibility under extreme loads.
Will repairing this adhesive damage ruin my car's resale value?
No, using modern adhesives to stabilize a failing factory seam is considered a necessary safety repair and is widely accepted by classic car judges.