There is a distinct chill in the autumn morning air as you step into the garage, greeted by the faint, comforting aroma of chain lube, high-octane fuel, and cold concrete. Under the dim fluorescent tube, your Kawasaki sportbike rests on its rear stand, its iconic lime-green fairings polished to a mirror shine. You have spent hours with a toothbrush cleaning every speck of road grit from the swingarm and wiping down the links until they gleam like fine jewelry. To any casual observer, this motorcycle is a pristine masterpiece, ready to command top dollar on the resale market.
But beneath that immaculate surface, a silent mechanical disaster is unfolding. As you roll the bike forward, there is no sound other than the faint metallic clicking of the rollers engaging the sprocket teeth. It feels tight, precise, and crisp—exactly how most riders believe a high-performance machine should feel. You press your thumb against the bottom run of the chain, and it barely budges a half-inch. You smile, thinking you have eliminated all sloppy play from your drivetrain.
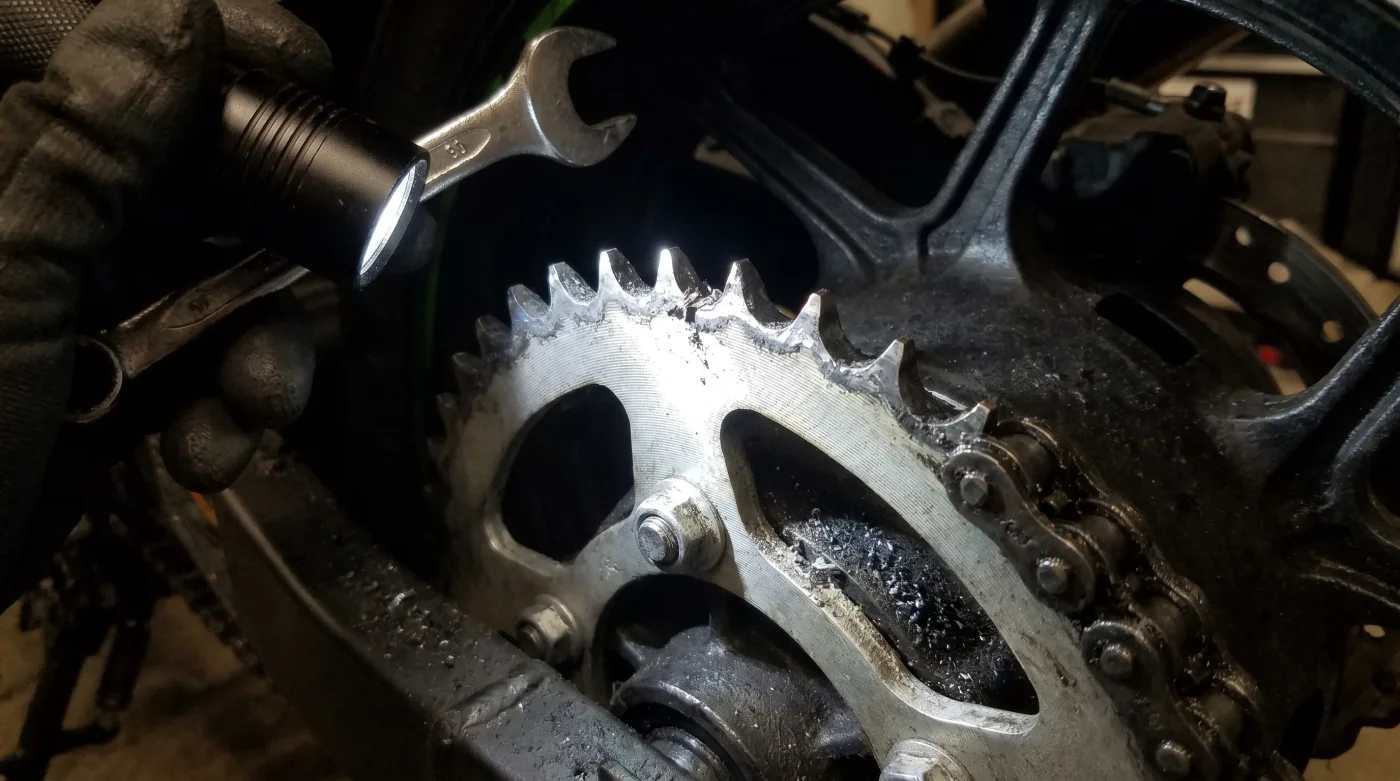
That tight chain is actually a slow-motion wrecking ball aimed directly at your engine’s crankcases. When you eventually ride into a dealership to trade up to a newer model, the appraiser will not be fooled by your spotless fairings or your freshly scrubbed wheels. They will squat down on the left side of the machine, shine a flashlight behind the front sprocket cover, and look for a very specific, devastating wear pattern that instantly slashes thousands of dollars off your trade-in offer.
The Guitar String Metaphor and the Illusion of Tightness
To understand why this happens, you must abandon the idea that a motorcycle chain is a static drive belt. Think of your chain instead as a steel guitar string that must change pitch as the swingarm moves through its natural arc. When your rear wheel travels upward to absorb a bump, the distance between the countershaft sprocket and the rear axle actually increases. If your chain is already taut while the bike sits unladen on its stand, it becomes a rigid steel bar at the exact moment your rear suspension compresses.
This extreme tension acts like a massive crowbar prying on your engine's output shaft. The factory manual often recommends a tight slack range that assumes a lightweight rider and empty pockets. In the real world, running your chain at the minimum factory tension while carrying a backpack or cornering hard forces the swingarm to yank violently on the transmission. This constant pulling creates a highly recognizable **asymmetrical shark-toothing wear pattern** on the trailing edge of your sprocket teeth, signaling to any trained technician that your transmission bearings have been subjected to immense, destructive stress.
- Ford stock rallies after executives quietly shift production toward high-margin hybrid architectures
- Ford Bronco recall triggers a massive buyer panic over hidden steering failures
- One million new car buyers vanishing forces dealers to quietly slash flagship MSRPs
- General Motors architecture exposes a severe battery pacing flaw Ford entirely avoids
- Chevy Equinox used buyers must check this exact timing chain auditory rattle
A Costly Discovery on the Service Bay Floor
Marcus Vance, a 47-year-old lead appraiser at a high-volume Kawasaki dealership in Cincinnati, sees this mistake play out almost every weekend. “Nine times out of ten, a rider brings in a spotless Ninja ZX-10R with expensive carbon fiber accessories, but their chain is pulled as tight as a piano wire,” Marcus explains. “I immediately drop to one knee and check the area around the countershaft sprocket seal. If I see even a faint mist of oil weeping from that bearing, I know the tight chain has deformed the output shaft bearing pocket. That is not a simple fix; it requires splitting the engine crankcases. I have to write up a $1,800 service estimate on the spot, which comes straight off their trade-in value.”
Tension Dynamics Across the Kawasaki Fleet
Different models handle tension in distinct ways because of their unique chassis geometry and suspension travel. Knowing your specific machine's behavior is the key to preserving its mechanical integrity.
For the Lightweight Commuter (Ninja 400 & 500):
These compact machines have relatively short swingarms, meaning that small changes in rider weight dramatically alter the rear suspension sag. If you commute with a heavy backpack or occasionally carry a passenger, your baseline chain slack must be set toward the looser end of the spectrum to prevent the chain from binding when the suspension bottoms out.
For the Supersport Purist (ZX-6R & ZX-10R):
Track-oriented geometry relies on high anti-squat characteristics. When you crack the throttle open, the rear suspension naturally wants to extend, but hitting mid-corner bumps will still compress the shock fully. **Running your chain too tight** kills your mid-corner stability, prevents your rear shock from absorbing bumps correctly, and can cause terrifying mid-corner traction loss.
For the Sport-Touring Nomad (Ninja 1000SX):
With hard saddlebags and a passenger, these touring machines undergo massive suspension travel over highway expansion joints. Setting your chain to the tight side of the factory specification guarantees that your chain will stretch unevenly, ruin your sprocket teeth, and wear out your rear wheel bearings within a few thousand miles.
The Zen of the Loose Chain
Adjusting your chain should never be a rushed chore completed with cheap adjustable wrenches. It is a precise, mindful ritual that requires patience and the right tools. To get a true reading, you must first find the tightest spot in your chain by rolling the motorcycle forward and measuring the slack at multiple intervals.
- Always measure with weight on the bike. Have a friend sit on the seat to compress the suspension to your typical riding sag before checking the play.
- Aim for the loose side of the range. If your swingarm sticker calls for 25 to 35 millimeters of slack, always aim for 32 to 34 millimeters. A slightly loose chain is happy and quiet; a tight chain is quiet but destructive.
- Verify your wheel alignment. Never rely solely on the tick marks stamped into the swingarm. Use a dedicated chain alignment tool to ensure your sprockets run perfectly parallel.
- Torque your axle nut mindfully. Place a clean rag or a small screwdriver between the chain and the rear sprocket, then rotate the wheel backward to lock the axle adjusters firmly against their stops before tightening the nut to spec.
Tactical Toolkit:
– A calibrated vernier caliper or dedicated chain slack tool.
– A high-quality torque wrench and a 32mm socket for the rear axle nut.
– A simple chain alignment tool that clamps to the rear sprocket.
– A small logbook to record your tension measurements every 500 miles.
Mechanical Harmony Over Cosmetic Perfection
A motorcycle is not a static museum piece to be polished and admired from afar; it is a complex, dynamic system of forces designed to move in perfect harmony. When we focus entirely on cosmetic cleanliness while ignoring the silent, heavy strain of an overtightened drivetrain, we miss the core essence of machine ownership. Giving your chain that extra quarter-inch of breathing room does far more than just protect your financial investment at the dealership trade-in desk. It frees up parasitic horsepower, smoothens your low-speed throttle transitions, and allows your rear suspension to float effortlessly over the asphalt. True mechanical care isn't about what looks spotless under the garage lights—it is about how freely your machine breathes on the open road.
“A slightly loose chain only hurts your ears with a little noise; a tight chain quietly eats your engine from the inside out.” — Marcus Vance
| Key Point | Detail | Added Value for the Reader |
|---|---|---|
| Sprocket Shark-Toothing | Teeth wear into asymmetrical, forward-leaning hooks. | Instantly alerts you to previous overtightening before major damage occurs. |
| Output Shaft Seepage | Oil misting around the front sprocket housing. | Flags a compromised countershaft bearing seal, saving you from buying a damaged used bike. |
| Real-World Slack Setting | Aim for 32mm to 35mm of slack with rider weight applied. | Preserves your transmission bearings and maintains rear suspension compliance. |
Frequently Asked Questions
How can I tell if my chain is too tight while riding?
You will often hear a distinct, low-frequency whining noise from the front sprocket area when rolling to a stop, or feel a strange, gritty vibration through your left footpeg under acceleration.Why does the factory manual recommend such a tight slack spec?
Factory specifications are calculated using a baseline 150-pound rider with zero gear, representing the absolute minimum safe clearance for that specific weight scenario.Can a tight chain actually crack my engine cases?
Yes. Under extreme suspension compression, a tight chain can exert thousands of pounds of force on the countershaft, cracking the aluminum engine case around the bearing pocket.How often should I clean and adjust my chain?
You should clean, lubricate, and inspect your chain tension every 500 miles, or immediately after riding through a heavy rainstorm or carrying a passenger.Is it better to have a chain that is too loose or too tight?
It is always better to err on the side of a slightly loose chain. A loose chain might make a little noise, but it will never destroy your transmission bearings or ruin your resale value.