A warm Saturday morning in the driveway begins with the best of intentions. You have washed, clayed, and prepped your car, and now you hold a brand-new bottle of ceramic spray. The chemical scent of isopropyl alcohol and synthetic carrier solvents hangs heavy in the humid air as you prepare to seal your vehicle with a protective glass-like shield. It feels like the ultimate weekend victory, a simple task to preserve your pride and joy.
But as the liquid chemical spreads across the sheet metal, the relentless morning sun quickly accelerates the curing process. What should be a smooth, effortless glide turns into a sticky, stubborn drag. Before you can grab your buffing towel, the active silicon dioxide molecules cross-link instantly with the clear coat, trapping the liquid in an uneven, hardened glaze.
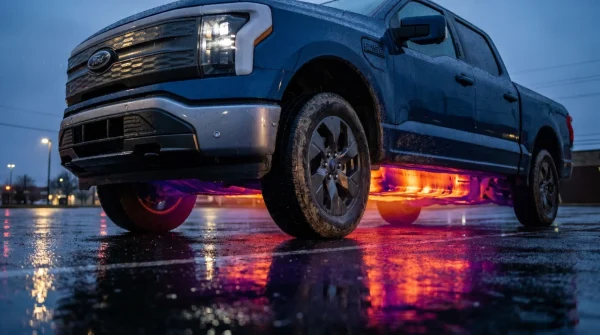
By the time you step back, the horror sets in. Under the bright, overhead glare, cloudy, rainbow-colored streaks run across your dark metallic hood. What was supposed to be a flawless mirror-like finish now looks like an iridescent oil slick frozen forever in glass.
You reach for a quick-detailer spray, then a clay bar, but nothing budges. This is not grease, dust, or wax; it is a microscopic layer of quartz-hard silica chemically fused to your automotive paint. In your quest to protect your vehicle, you have initiated a permanent bonding process that cannot be washed away.
The Illusion of DIY Protection
We are conditioned to believe that adding protective layers to our assets always increases their value. We purchase rubber floor mats, heavy-duty cargo liners, and high-tech sealants with the expectation that we are building a protective bubble around our investments. However, modern ceramic coatings are not traditional car waxes; they are highly reactive covalent-bonding liquid polymers that permanently alter the surface energy of your factory clear coat.
When you apply these formulas in direct sunlight or on a warm panel, you are not laying down a temporary shield. You are essentially baking a flawed glass window directly onto your car’s delicate paintwork. If that window cures with streaks, high-spots, or trapped dust, the only way to remove it is to grind the glass down, taking a portion of your factory clear coat with it.
- Costco Auto Program pricing hides mandatory dealer accessory packages at delivery
- Honda CR-V used buyers should check the dipstick for gasoline fumes
- RAM 1500 Ramcharger proves heavy towing demands a gas generator backup
- Hyundai e-Corner crab walking destroys tire treads on dry summer asphalt
- 2027 GMC Sierra 1500 leaks reveal a drastic payload limit downgrade
The Dealership Reality Check
Consider Marcus Vance, a 42-year-old vehicle acquisition specialist at a premier pre-owned luxury dealership in Ohio. He sees this scenario unfold almost every week during trade-in appraisals. "People bring in late-model trucks and sedans, proud of their DIY ceramic jobs, expecting us to pay them a premium for paint protection," Marcus explains. "But when I pull the car under our inspection lights and spot those iridescent, hazy streaks baked onto the hood and doors, I see a liability. It tells me we have to pay our detail shop for an intensive, multi-stage machine correction to level the paint. I immediately dock fifteen hundred dollars off the trade value because of those DIY mistakes."
Mapping the Ceramic Mistakes
The Casual Spray Enthusiast
Many drivers rely on consumer-grade ceramic booster sprays, thinking they are foolproof. While these formulas have lower silica concentrations, they still contain active polymers that flash rapidly when exposed to heat. Applying them to a warm panel causes the liquid to evaporate before it can level, leaving cloudy patches that attract dust and ruin the depth of your paint.
The Concentrated Suede Applicator
Using a professional-grade ceramic vial with a suede applicator block requires surgical precision. If you apply these highly concentrated liquids without a temperature-controlled space, the curing window shrinks from minutes to seconds. This results in hardened ridges called high-spots that resist standard hand polishing and require aggressive mechanical leveling.
The Unprepared Surface
Applying a ceramic layer without performing a thorough chemical and physical decontamination is a critical error. You end up locking road grime, microscopic iron filings, and mineral deposits underneath the cured shell. This not only destroys the gloss but also creates a bumpy texture that locks road grime and spots directly into the finish.
The Art of the Perfect Cure
Avoiding these costly paint correction mistakes requires a shift in how you view the application process. You must treat ceramic coating as a chemical installation rather than a simple detailing chore. This means coordinating your work with the weather, your physical workspace, and the temperature of the vehicle’s panels.
Always work inside a garage or under a deep canopy, ensuring the vehicle has cooled down completely. Your goal is to work in small, manageable sections, checking your progress from multiple angles with a focused light source. By controlling the environment, you extend the flashing window, giving yourself ample time to level the product safely.
- Check the metal temperature: Use your hand or an infrared thermometer to ensure the panels are below 75 degrees Fahrenheit.
- Work in two-foot sections: Never try to coat an entire hood at once; split panels into small, manageable grids.
- Observe the flashing behavior: Watch for the liquid to bead up or show a slight rainbow effect, signaling it is ready to be buffed.
- Employ the two-towel method: Use your first clean microfiber towel to level the excess liquid, and follow immediately with a second plush microfiber to polish the surface clean.
Your primary tactical toolkit should include an infrared thermometer, a high-lumen LED work light with adjustable color temperatures, a prep spray of 15% isopropyl alcohol, and at least six clean, edgeless microfiber towels rated at 350 GSM or higher. This setup ensures you can monitor the surface temperature and level the product before it hardens.
Reclaiming Pride in the Garage
There is a quiet, meditative joy in restoring a vehicle’s finish by hand. It connects you to the physical machine in an era where most of our interactions are mediated by smooth digital screens. But this hands-on work requires a deep respect for the physical and chemical limits of modern automotive coatings.
When you step back from a perfectly cured, mirror-like panel, you are looking at more than just shiny paint. You are looking at patience, discipline, and a deep respect for the craft. By taking your time and working with the elements rather than fighting them, you protect your pride of ownership and secure your vehicle’s true market value.
"The chemical bond of modern liquid silica is completely unforgiving; physical paint correction is the only cure for haste." — Marcus Vance, Vehicle Acquisition Specialist
| Key Point | Detail | Added Value for the Reader |
|---|---|---|
| Panel Temperature | Must be below 75 degrees Fahrenheit. | Prevents premature flashing and permanent streaks. |
| Lighting Control | Use high-lumen, multi-angle LED lights. | Reveals hidden high-spots before they cure. |
| Two-Towel Method | First towel levels; second towel buffs. | Ensures uniform thickness and maximum gloss. |
Frequently Asked Questions
Can I wash off a bad ceramic coating application?
No, standard soap and water will not dissolve a cured ceramic coating. Because it chemically bonds to your clear coat, you must physically level the surface using a dual-action polisher and compounding pads.How long do I have to fix a high-spot before it cures?
You typically have a window of three to five minutes depending on humidity and temperature. Once the coating cures past this point, hand-wiping will not remove the streak.Why does direct sunlight ruin ceramic spray application?
Direct sunlight heats the vehicle’s metal panels, causing the carrier solvents in the spray to evaporate instantly. This forces the active silica to cure unevenly before you can level it.Will a clay bar remove cured ceramic streaks?
A standard clay bar is designed to remove above-surface contaminants and is generally not abrasive enough to cut through a chemically cured ceramic coating.How do dealerships check for bad ceramic coatings?
Appraisers use high-intensity inspection lamps and polarized glasses during trade-in evaluations to detect uneven reflections, hazy spots, and rainbow-like halos on flat panels.