The cold click of a dead door handle is a quiet, sharp disappointment. On a wet autumn morning, you stand beside your Tesla Model S with key fob in hand, watching three of the chrome wings glide smoothly out from the bodywork while the driver’s side remains stubbornly flush. You touch the cold metal, hoping for the familiar motorized greeting, but receive only a hollow, mechanical silence.
Inside the door panel, the electric motor tries to cycle, but nothing happens. You might hear a soft, faint whir followed by a dull thud before the system gives up entirely. On your center screen, a persistent alert warns you that the door latch requires service, casting a shadow over your morning commute.
The local service center has a predictable script for this situation. They will quote you upwards of twelve hundred dollars to replace the entire door handle assembly, claiming the unit is a sealed, high-tech mechanism that cannot be serviced piece-by-piece. They treat the door handle like a disposable computer chip rather than what it actually is: a collection of simple physical levers.
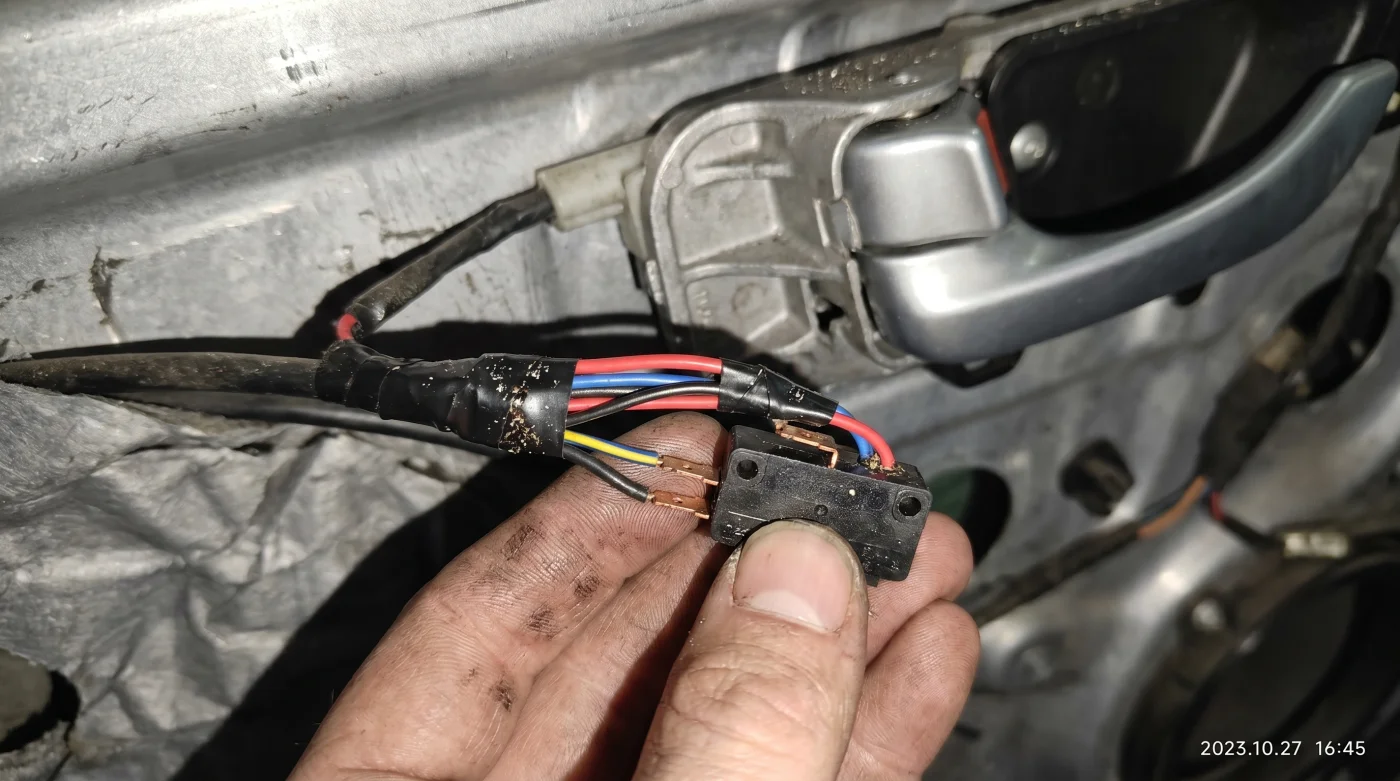
But inside a quiet, solder-scented garage, a different reality unfolds. Underneath the cast metal gears and the wiring looms lies a simple, five-dollar microswitch that is almost always the sole culprit. It is not a design tragedy, but rather a tiny copper contact that has simply lost its connection due to cheap factory wiring harness strain relief.
The Illusion of the Sealed Monolith
Think of your door handle like a light switch in an old house. If the bulb doesn’t light up when you flip the switch, you do not tear down the drywall and replace the home’s entire electrical panel. You simply change the switch. Unfortunately, the modern automotive industry has trained us to treat complex vehicles as collections of monolithic, unrepairable blocks. When one small solder joint cracks, they want you to throw away the entire aluminum housing.
The real secret of the Model S door handle lies in understanding its sensory loop. The car needs to know three things: is the handle fully retracted, is it fully extended, and is someone pulling on it to open the door? These questions are answered by three tiny microswitches riding on a rotating cam. When the wire leading to the pull-detector switch snaps, the car’s computer flies blind, disabling the handle as a safety precaution. By replacing just this tiny sensor, you bypass the expensive diagnostic code and restore factory functionality without paying the dealership tax.
- Chevy Silverado automatic transmission flushes permanently destroy clutch pack friction and tank resale value
- Mazda SKYACTIV engines require a specific intake valve cleaning to hit 200,000 miles
- Tesla Model 3 broker fees expose a hidden direct-to-consumer pricing trap
- Tesla Model 3 used inspections demand a strict subframe corrosion check buyers ignore
- Mazda premium crossover dealership markups create a massive artificial pricing penalty over MSRP
Consider the experience of Marcus Vance, a forty-eight-year-old industrial maintenance technician from Portland, Oregon. When the passenger-side handle on his 2015 Model S failed to present, he refused to write a thousand-dollar check for a car that was already out of warranty. Instead, he pulled the handle assembly apart on his kitchen table under a bright desk lamp. Using a basic digital multimeter, Marcus traced the continuity of the factory harness and found that the copper strands inside the harness had sheared clean through at the pivot point, while the switch itself was perfectly healthy. By installing a heavy-duty, silicone-jacketed wiring harness with a brand-new subminiature switch, he fixed the issue permanently for less than the cost of a cup of coffee.
Targeting the Weak Points Across Generations
Tesla modified these handles multiple times, meaning your repair strategy depends entirely on how your handle behaves when it fails.
For the early adapters driving pre-2016 models, the issue is often a combination of a broken cast-aluminum paddle gear and a sheared wire. If you hear the motor spinning frantically inside the door but the handle refuses to come out, your gear has snapped, and you will need to swap it for a reinforced stainless steel aftermarket paddle alongside your electrical repair. The motor itself is rarely dead; it is simply spinning in a void.
For owners of mid-generation cars built between 2016 and 2020, the mechanical gears are incredibly robust, but the electrical wiring remains a major bottleneck. The repeated constant, back-and-forth movement of the handle flexing the harness eventually snaps the brittle copper wires inside the insulation. In these models, the microswitch itself is often fine, but the wire has sheared right where it exits the epoxy casing of the switch.
Late-model cars use magnetic sensors that are far less prone to wire fatigue, but they can still fail if water finds its way past the seals. If you live in a rainy climate or wash your car frequently with high-pressure sprayers, water can seep into the electrical connectors, causing corrosion that mimics a dead switch. Cleaning these contacts with electronic cleaner often solves the issue instantly.
The Microswitch Resurrection: A Step-by-Step Guide
To perform this fix, you will need to set aside about two hours of quiet, focused time in a well-lit space. The goal is to replace the fragile factory microswitch with a highly durable, waterproof alternative, such as a Panasonic AH1880619 or a compatible cherry-style subminiature switch equipped with highly flexible silicone wires.
Begin by rolling the window completely up and removing the interior door panel. You will need to carefully disconnect the speaker and puddle light wiring harnesses before peeling back the foam sound barrier to expose the inner door cavity.
- Step 1: Locate and remove the three 10mm nuts holding the door handle housing to the inner door skin. Carefully slide the assembly down and out of the door cavity.
- Step 2: Set the handle assembly on your workbench. Locate the microswitch harness; the switch responsible for opening the door is the one positioned near the main pivot paddle.
- Step 3: Snip the factory zip ties and unscrew the small retaining plate holding the failed microswitch in place.
- Step 4: Cut the old switch wires, strip the insulation back by a quarter-inch, and slide marine-grade heat shrink tubing over the wires.
- Step 5: Solder the new, silicone-jacketed microswitch wires directly to the factory harness, ensuring a clean, shiny solder joint that won’t degrade under vibration.
- Step 6: Heat the shrink tubing with a heat gun to seal the joint against moisture, reinstall the switch onto the housing, and apply a dab of lithium grease to the moving contact points.
The tactical toolkit for this job is minimal and highly affordable. You will need a standard metric socket set, a basic soldering iron with leaded solder, some adhesive-lined heat shrink tubing, and a set of plastic pry tools to safely remove the interior door panel without scratching your leather trim.
Reclaiming Agency in an Age of Software
Fixing a high-tech electric vehicle with a soldering iron is an immensely satisfying act of rebellion. It proves that despite the complex software, digital screens, and over-the-air updates, these machines are still governed by the laws of physics. They still rely on copper, solder, and physical contact to interact with the physical world.
By refusing to accept the service center’s mandate, you do more than just save a thousand dollars. You gain a deep, intimate understanding of how your car functions. The next time you walk up to your Model S and the door handle glides out to greet you, you won’t just see a sleek piece of modern design. You will know exactly how the copper contacts are whispering to the car’s computer, keeping you moving forward on your own terms.
“The secret to keeping modern electric cars on the road isn’t sophisticated software diagnostics; it is refusing to let a tiny, five-cent wire dictate the life of a thousand-dollar component.” — Marcus Vance
| Key Point | Detail | Added Value for the Reader |
|---|---|---|
| The Dealership Approach | Demands a full replacement of the entire door handle assembly for over $1,200. | Saves time for the mechanic but wastes your money and creates unnecessary electronic waste. |
| The Microswitch Fix | Replaces only the vulnerable $5 Panasonic microswitch using a soldering iron. | Saves more than $1,000 while addressing the actual engineering bottleneck permanently. |
| Harness Stress Relief | Replacing stiff factory wiring with highly flexible silicone-insulated wiring. | Prevents the copper strands from shearing again due to repeated handle movements. |
Frequently Asked Questions
Will repairing my own door handle void my entire Tesla vehicle warranty?
No. Under the Magnuson-Moss Warranty Act, a manufacturer cannot void your entire vehicle warranty simply because you repaired a single component yourself, though any damage caused directly by your repair would not be covered.How can I tell if my door handle failure is mechanical or electrical?
If the handle extends but pulling it does not open the door, the failure is electrical (microswitch or wire harness). If you hear a motor spinning but the handle remains flush, the failure is mechanical (paddle gear).Do I need to recalibrate the door handle using Tesla diagnostic software after the fix?
No calibration is required. Once the new microswitch is soldered in place and the circuit is restored, the door control module will automatically recognize the signal and resume normal operation.Which specific replacement microswitch should I purchase for this repair?
The most reliable replacement is the Panasonic AH1880619 microswitch, or a similar waterproof subminiature switch featuring pre-wired flexible silicone leads designed for high-flex environments.Can I perform this repair without removing the entire door handle from the car?
While some owners with immense patience have spliced wires inside the door cavity, it is highly recommended to remove the assembly completely to ensure clean solder joints and proper heat-shrink sealing.