The silent cabin of your electric crossover is supposed to be a sanctuary. You glide down wet asphalt, insulated from the combustion rattle of the past, listening to nothing but the quiet hum of the road. But lately, a low-speed turn into a driveway produces an unsettling sound: a high-pitched, dry-rubber groan that echoes through the front footwell. It sounds like an ancient wooden floorboard flexing under a heavy step.
Underneath the clean lines of your floorboards lies a massive battery pack weighing over a thousand pounds. This weight rests heavily on a suspension system designed to handle traditional combustion-car dynamics but modified to support modern electric loads. When you park in a quiet garage, you might assume that because your car receives over-the-air software updates, the physical components under the wheel wells are similarly maintenance-free.</p
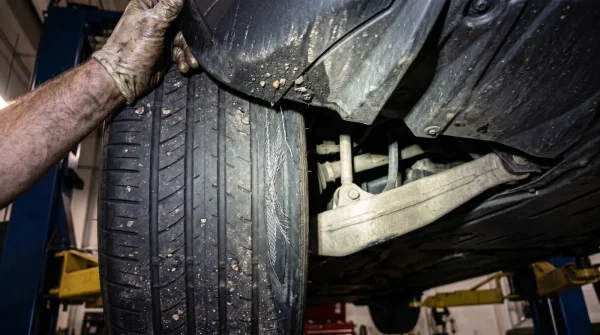
That assumption vanishes the moment you jack up the front end and remove the wheel. As thousands of these crossovers cross the hundred-thousand-mile threshold on the secondary market, a glaring physical vulnerability is coming to light. The suspension system, particularly the upper control arms, is fighting a quiet war against dry friction, road salt, and structural fatigue.
The Myth of the Maintenance-Free Chassis
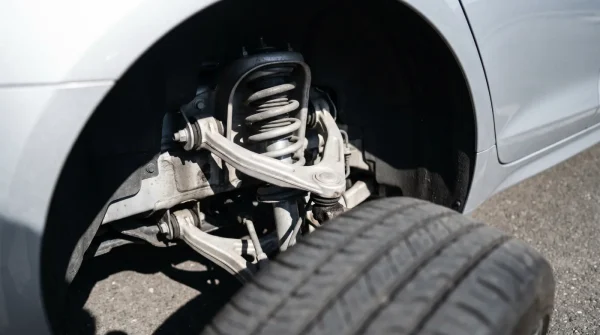
We have been conditioned to believe that electric drivetrains require no physical upkeep beyond cabin air filters and tire rotations. This is a comforting illusion, a marketing narrative designed to contrast with the messy reality of oil changes and spark plugs. In truth, the mechanical joints of your steering system are still subject to the laws of classic physics. The factory-sealed ball joints on your upper control arms are particularly vulnerable to this oversight.
Think of these sealed joints like a premium leather boot with a sole secured by cheap water-soluble glue. The manufacturer calls them “sealed for life,” but that life expectancy is calculated based on standard warranty periods, not the actual lifespan of a vehicle driven through freezing winters and humid summers. Once the factory grease degrades, moisture sneaks in, converting your steering precision into a gritty, grinding chore.
Marcus Vance, a forty-six-year-old independent fleet mechanic in Portland, Oregon, spends his days servicing high-mileage electric vehicles. “Every single Model Y that rolls into my shop with more than eighty thousand miles has dry front knuckles,” Marcus notes. “The design uses a hard plastic boot that works well in a dry climate, but once road grit gets kicked up by wide tires, it turns into sandpaper, grinding through the factory barrier and leaving the internal ball joint completely dry.”
The Environmental Stress Profiles
Not every vehicle wears out its components in the exact same manner. Depending on your local climate and daily driving habits, your front suspension faces unique physical challenges that require distinct approaches to long-term care.
- Motor1 pricing algorithms expose aggressive margin padding inside popular digital car brokers
- Subaru Forester moonroof recall inspections require checking the specific interior headliner water stains
- Corvette Stingray allocation tracking exposes predatory artificial dealership inventory holding tactics
- EV charging station voltage drops expose severe winter battery heating limitations
- Audi Nuvolari concept chassis engineering delivers Bentley structural rigidity for older A5 coupes
The Salt-Belt Commuter faces the most aggressive wear. Winter road brine acts as an electrolyte, accelerating rust inside the steering knuckle and seizing the ball joint shaft. For these drivers, checking the rubber boots should be an annual autumn ritual before the first snowplow hits the highway.
The Sunny-State High-Miler deals with dry heat instead of moisture. Intensive sun exposure and hot pavement bake the factory grease until it hardens into a useless, waxy crust. Without active lubrication, the steel ball wears a pocket into its socket, causing steering play and alignment drift.
For the Secondary-Market Hunter, finding a clean chassis requires a careful physical inspection. If you are shopping for a used electric crossover, do not just trust the digital screen inside the cabin. Bring a flashlight, turn the wheels to full lock, and inspect the upper arm assembly for early signs of grease weeping.
The Precision Lubrication Protocol
Addressing this dry joint does not require spending thousands on brand-new factory arms that will eventually suffer the exact same fate. By applying a surgical intervention, you can restore silent operation and extend the life of your original hardware. This task requires patience, a steady hand, and a clean workspace.
Keep your work area clean to prevent introducing dirt into the open joint. You will need to access the rear side of the upper control arm ball joint, which is easiest to reach with the steering wheel turned to its outermost angle. Never force grease into a cold joint; perform this procedure in a warm garage so the lubricant flows smoothly.
- Jack up the front of the vehicle safely and secure it with heavy-duty jack stands.
- Locate the upper control arm ball joint boot behind the front brake shield.
- Wipe the rubber boot completely clean of road film using a microfiber cloth and isopropyl alcohol.
- Insert a grease gun equipped with a 21-gauge syringe needle carefully into the top crown of the boot.
- Pump two to three squirts of marine-grade synthetic lubricant into the void.
- Seal the puncture site with a tiny dab of black silicone sealant to prevent moisture entry.
Your tactical toolkit should include a manual grease gun, a 21-gauge needle attachment, a cartridge of waterproof synthetic grease containing PTFE, and a high-quality silicone sealant. This simple list of tools costs less than a single diagnostic fee at a corporate service center.
Preserving Your Silent Cabin
Taking control of your car’s mechanical health brings a unique sense of satisfaction. It grounds your relationship with a highly computerized machine, reminding you that physical components still require physical care. When you silence that annoying groan, you are not just fixing a noise; you are protecting your steering rack from premature wear.
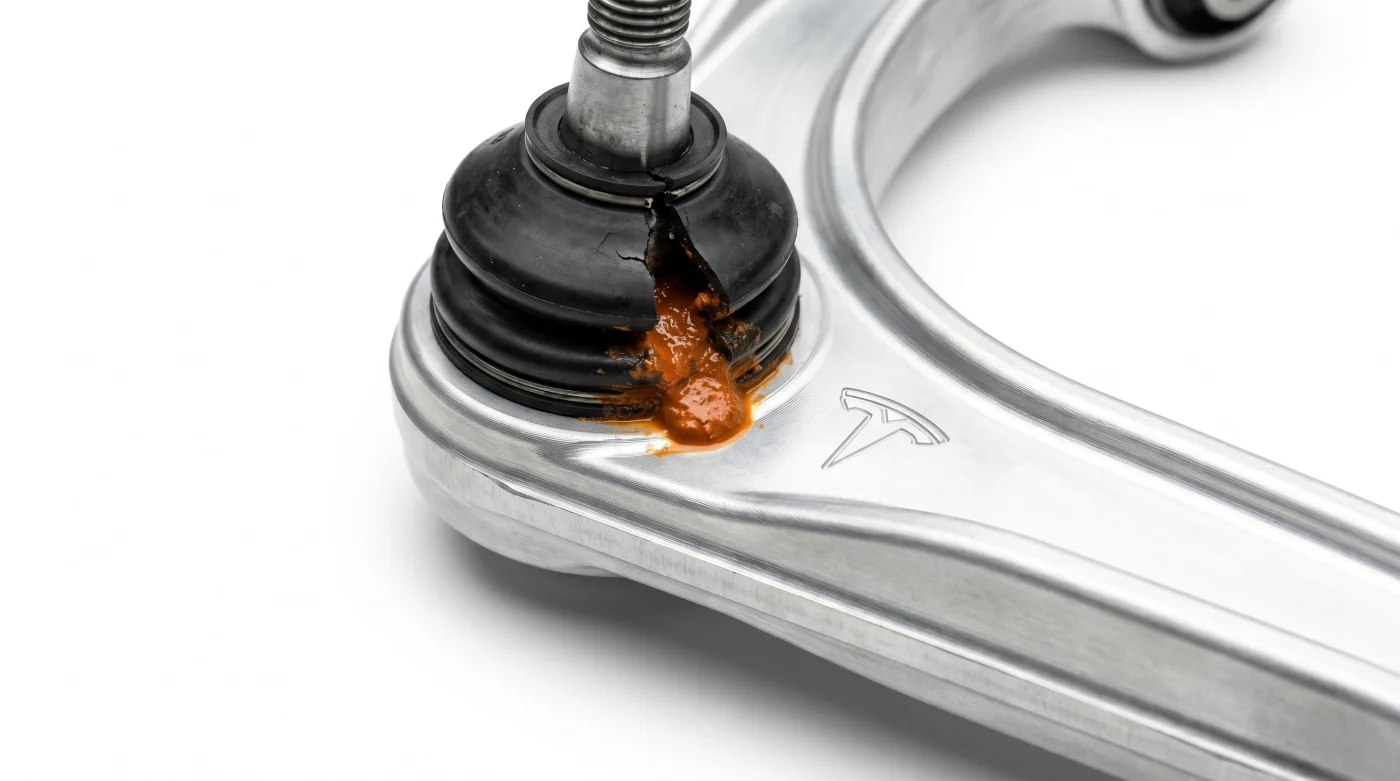
Neglecting this simple maintenance task leads to an inevitable, ugly end. If you wait too long, the steering wheel will begin to shudder over small road imperfections, telegraphing the damage straight to your hands. By then, the damage is done: you will find a cracked black polyurethane dust boot leaking a rusty orange paste, signaling that the steel joint inside has ground itself to dust.
“True longevity in an electric vehicle isn’t found in the battery health screen, but in the quiet grease inside the steering knuckles.”
| Key Point | Detail | Added Value for the Reader |
|---|---|---|
| Squeak Source | Dry upper ball joint seals | Identify the exact origin of low-speed front-end groans. |
| Lubricant Spec | Waterproof marine-grade synthetic with PTFE | Prevents wash-out from heavy rain and winter road spray. |
| Injection Method | 21-gauge syringe needle puncture | Avoids tearing the boot, preserving structural integrity. |
| Service Interval | Every 60,000 miles or 3 years | Proactive care before physical steering components wear out. |
Frequently Asked Questions
Will this lubrication procedure void my factory vehicle warranty? No, performing basic suspension maintenance or lubricating wearing parts does not void your vehicle warranty, provided you do not damage surrounding steering components during the process.
Can I use standard chassis grease instead of marine-grade synthetic? Standard grease will wash out quickly when exposed to rain and road spray; marine-grade synthetic with PTFE resists moisture and high-pressure washing far better.
How do I know if my upper control arm is already past the point of saving? If you feel a physical clunk through the steering wheel or notice visible play when wiggling the tire by hand, the ball joint is worn out and requires complete replacement.
Why doesn’t the manufacturer install grease fittings on these joints? Modern manufacturers design components to be maintenance-free to lower initial ownership cost metrics, leaving long-term buyers to manage wear on the secondary market.
How long does the needle injection procedure take to complete? With the wheels removed and tools ready, the lubrication process takes about thirty minutes per side in a standard home garage.